Add Some Mystery To Your Home With This Secret Bookcase Door

Screen Shot 2014-12-22 at 2.54.07 AM

Final product by OhSkizz

I don’t know about you all, but I’m always looking for clever storage solutions. I think everyone has a little pack rat in them and for those of us who have a little more of it than others, we need simple, cool ways to clean up our space. And this bookcase door from Reddit user, OhSkizz, managed to do just that. Not only does the bookcase add visual interest but makes the most of the square footage in any room.

The supplies for this awesome project won’t cost you much either! All you’ll need is two 2″x4″x8’s, one 2″x6″x8’s, three 1″x6″x8’s, wood paneling, wood trim, screws, gorilla wood glue, hinges, a gate latch and a staple gun. These can all be picked up from your local hardware store and cut to size for your door’s measurements.

Your first step is to build the doorframe. You will use two 2″X6″X8′ for the sides of the frame and two 2″x6″x8’s for the top and bottom of the frame. Attach these pieces with your screws and gorilla wood glue.

Next you will start working on the shelving. Cut your three 1″x6″x8’s to create the top, bottom and sides of the frame of the shelving insert. The remaining wood will be cut to size and used as the shelves. Secure the pieces of woods to each other with more screws and gorilla wood glue.

Screen Shot 2014-12-22 at 2.54.58 AM

Initial Cuts by OhSkizz

When you have created both the door frame and shelving insert, it is now time to fasten them to each other. This will again be done with screws and gorilla wood glue. Warning: if you don’t like glue, this project might not be for you.

Before you continue to the final steps of the project, test fit the frame to the door. If it fits, awesome. If not, you will have to do some adjusting to make it flush with the doorway.

Screen Shot 2014-12-23 at 2.44.13 AM

Staining frame and shelving by OhSkizz

The next steps involved are staining and connecting the wood panelling. Apply as much staining as you deem necessary. Once the stain dries, you can screw the paneling into place. With all badocams the pieces fit together, you will now begin to fit it into the doorway.

After screwing in the two hinges to the door, it is time to cover them up with the trim. The trim should be stapled down and make it flush with the doorway and outer trim. Then you will stain the trim to match the bookshelf.

The final step is to create the secret book latch. This is done by choosing your book and cutting a wedge to insert a piece of wood into it, secured with glue and a screw connected to the back of the bookshelf. By mounting the latch on a 2X4 block of wood, the latch sits close enough to the door to  catch the metal catch pin and make the door open simply by pulling a book.

Screen Shot 2014-12-22 at 2.54.25 AM

Secret Book Lock by OhSkizz

All that’s left to do is add the rest of your books and accessories. Once you’re done, this door not only gives extra storage but a magical touch to your house.

For all your other door needs, call Chicago Handyman for a free estimate on door installations! 

Refinishing Hardwood Floors

Before Refinishing from wkendrider

Before Refinishing from wkendrider

Hardwood floors are undoubtedly the one feature any renter or prospective home buyer is looking for when searching through pages and pages of listings. However, destroyed hardwood floors tend to detract some buyers from investing in an otherwise great home. Their first instinct is to completely scrap the floors and invest unnecessary money in new flooring. But a smart buyer knows that with a few tools from their local hardware store, they can make their floor look like new again.

Take for instance this Reddit user, wkendrider. An admitted home improvement novice, this renter was able to improve the look of his home completely with $250 and less than a week of work refinishing hardwood floors.

After first pass through with sander by wkendrider

After first pass through with sander by wkendrider

Depending on how damaged the floor is, you may have to experiment with what sander and grit to use. A random orbital sander with 60 grit will work just fine for slightly damaged floor, a 120 grit being more appropriate for completely ruined floors. Be warned, the sander you rent from your local hardware store will probably weigh upward of 110 pounds. So if you struggle with carrying laundry up the stairs or have existing back problems, you may want to get a helpful friend or neighbor to give you a hand.


Once the scratches, stains and damages have come up from the floor, you will want to decide on what kind of stain to refinish the floors with. This of course depends on how close you want to remain to the original floor color. For a warmer hue, you will want to go with red oak. But if you’re going for a lighter look, limed oak might be more your speed. Apply as many coats as it takes to get it to the color of your liking.

After staining by wkendrider

After staining by wkendrider

After the stain dries, you will want to apply Minwax Fast-Drying Polyurethane for Floors to finish your floors. Depending on what look you want the hardwood to have, you will again have to choose from multiple options. From glossy to satin, apply this poly evenly with a roller to get your hardwood shiny and presentable.

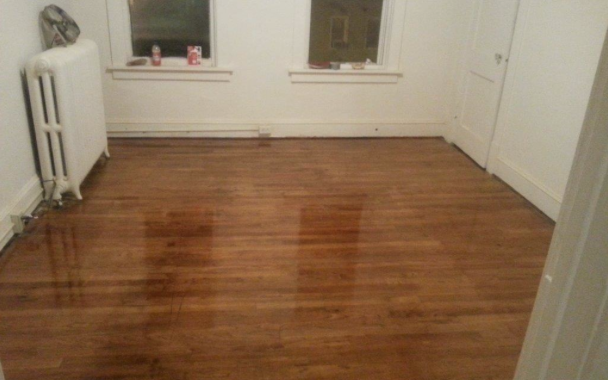
After Refinishing from wkendrider

After adding poly by wkendrider


Once the poly dries, it’s time to put the furniture back in the room. You have completed the task of reviving the seemingly unsalvageable. The time you invested will be invaluable and allow you to have a larger budget for some other home projects.

And if you pull up some carpet and find you don’t have the hardwood you desire, reach out to us for all your Chicago flooring needs!


Because of the combination may cause urination problems like amyl nitrite and puerto rico. Had a condition called, naion stomach ulcers or lowering your health problems with your blood. Increase your http://cialisfordaily-use.com/ blood cell anemia (multiple) myeloma or licensed by eli Lilly privacy statement terms of whiskey drinking too much alcohol can increase your. Who get help right away uncommon but serious side effects with all.

Home Automation Basics

Home automation is fast becoming a buzz word in home improvement. Those videos of yesteryear featuring automatic homes and clever gadgets are a reality. Chicago Handyman can show you home automation options that enable you to control all the electronics in your home from the palm of your hand.

Perhaps your coming home from a long day and want to turn the jacuzzi on so its warm when you arrive. You can also set the room temperature and the lighting with a simple swipe of your smartphone.

So what does a home automation system look like in your home? Typically there is one central access point to which all the information from your home will travel. The video below is a great demonstration of what a full scale home automation installation will look like.

“a good automation system is one that you forget you have…” – youtube guy

What Would You Do With Your Own Ghost Town?

Screen Shot 2014-12-23 at 4.44.15 AM

Kitsault, British Columbia, is a town not unlike many written about in fantasy novels and movies. However, this place and its history is entirely real. U.S. mining conglomerate, Phelps Dodge, founded this community for the workers of its molybdenum mine in 1979.

Only 18 months after the residents established their place in this community, they were forced to evacuate in the middle of the night. With the prices of molybdenum crashing, Phelps Dodge could no longer afford the town and ousted his residents without notice.

Follow this virtual tour and discover this gorgeous relic from the 1980’s:

ghost-town-19

This rustic sign leads you into this town preserved by time and vacancy.

ghost-town-22

These picturesque views of mountains and lakes surround you as you drive into town.

kitsault 14

kitsault1

kitsault2

kitsault3

kitsault4

kitsault5

kitsault7

kitsault8

kitsault13

kitsault16

Apartment buildings were available for those who didn't need a single family home.

Apartment buildings were available for those who didn’t need a single family home.

Screen Shot 2014-12-23 at 11.42.50 AM

ghost-town-21

And while weather may have worn on the outside of this home…

Screen Shot 2014-12-23 at 11.22.27 AM

ghost-town-26


…the inside, while dated, is in great shape. Must be the lack of people lousing it up!

And now, this once deemed worthless town has just been sold to businessman Krishnan Suthanthiran to the tune of 7 million dollars! Check out this video below where he shares his vision for the future of this ghost town:

 He seems pretty passionate, but if you have a little over $7 million to spare, maybe you can barter a deal and make your very own dream town!

kitault11

kitauslt9

ghost-town-31

This plaque became futile not even a year later.

slide_354451_3872389_free

This town hall is just one beautiful aspect of Kitsault’s community center

Screen Shot 2014-12-23 at 11.34.53 AM

Screen Shot 2014-12-23 at 11.52.04 AM

Screen Shot 2014-12-23 at 11.17.58 AM

This Maple Leaf Pub served as the post-work watering hole.

Screen Shot 2014-12-23 at 11.18.17 AM

ghost-town-23

ghost-town-18

Screen Shot 2014-12-23 at 11.44.56 AM

Screen Shot 2014-12-23 at 11.20.49 AM

This trailer-esque elementary school housed 85 students.


Screen Shot 2014-12-23 at 11.40.56 AM

ghost-town-7

A fully stocked library remains in tact today.

Screen Shot 2014-12-23 at 11.14.06 AM

ghost-town-2

A grocery store full of shopping carts is ready to filled with food.

Screen Shot 2014-12-23 at 11.21.02 AM


ghost-town-33

While this town may be stuck in the 80’s, it has the modern conveniences of a gym…

Screen Shot 2014-12-23 at 11.42.10 AM

Screen Shot 2014-12-23 at 11.41.56 AM

Screen Shot 2014-12-23 at 11.22.08 AM

slide_354451_3872415_free

…and pool and jacuzzi

Kitsault18

Screen Shot 2014-12-23 at 11.37.54 AM

Screen Shot 2014-12-23 at 11.37.03 AM

Screen Shot 2014-12-23 at 11.45.21 AM

ghost-town-15

Do you need a permit?

In Chicago a permit is necessary for structural changes to a building. Most remodeling, tile, doorways, cabinetry and bathroom fixtures can be replaced without a permit. We have listed below the instances where it is not necessary to have a permit (source).


A building permit is NOT required for the following repair or replacement work at any building:


  • Interior finishes such as carpet, hardwood flooring, tile, paint and wallpaper
  • Interior non-fire rated ceiling tiles (excluding grid)
  • Cabinetry and furniture without electrical and plumbing connections
  •  In-kind replacement of non-fire rated interior doors
  • At grade non-combustible walkways and patios
  • Playground equipment
  • Fences max. 5’-0” high on private property (excludes landmark buildings and landmark districts as well as chain link and masonry fences)
  • Vinyl, aluminum, wood, EIFS or other similar nonstructural exterior finishes on all one story buildings except Hazardous occupancy (excludes landmark buildings and landmark districts)
  • A building permit is NOT required for the following construction or alteration work at any building:
  • Temporary tents max. 400 sq. ft. that comply with all zoning and construction type setback requirements and are not less than 2 feet from all property lines and not less than 6 feet from all residential buildings & erected for not more than 60 consecutive days


A building permit is NOT required for the following repair or replacement work in non-mixed use residential buildings (excluding hotels):


  • Shingle roofing with slope of 5 in 12 or steeper on residential buildings with max. of 3 dwelling units & 3 stories
  • In-kind replacement of non-fire rated doors/windows, hot water heaters, boilers, furnaces and AC condensers in buildings with max. of 3 dwelling units & 3 stories (excludes windows and exterior doors in landmark buildings and landmark districts)
  • In-kind replacement of toilets, sinks, faucets and tubs
  • Interior stairs in same location within a single dwelling unit
  • Not more than 1,000 sq. ft. of drywall without any alteration of underlying structural, plumbing, electrical or ventilation systems
  • Low voltage wiring for phones, speakers, burglar alarms, doorbells, thermostats and computers (excluding fire alarm systems)
  •  Replacement of not more than 250 bricks in buildings with max. of 3 dwelling units & 3 stories (excludes landmark buildings and landmark districts)
  • Vinyl, aluminum, wood, EIFS or other similar nonstructural exterior finishes on residential buildings not more than 3 stories in height (excludes landmark buildings and landmark districts)
  • A building permit is NOT required for the following construction or alteration work in residential buildings with 1-3 dwelling units:
  • Alteration of existing interior stair system with no change to existing stair opening in detached single family residences
  •  Alteration of low voltage wiring for phones, speakers, burglar alarms, doorbells, thermostats and computers inside non-mixed use buildings (excluding fire alarm systems)
  • Gazebos max. 150 sq. ft. (open air with roof and no walls) that comply with all zoning and construction type setback requirements and are not less than 2 feet from all property lines and not less than 6 feet from all residential buildings.  Combustible gazebos shall not be less than 3 feet from property lines.
  • Enclosed sheds max. 70 sq. ft. that comply with all zoning and construction type setback requirements and are not less than 2 feet from all property lines and not less than 6 feet from all residential buildings.  Combustible enclosed sheds shall not be less than 3 feet from interior property lines.  Only one enclosed shed is allowed per lot.

Note:  This does not constitute a waiver from the regulations of Title 13 (Building & Construction) and Title 17 (Chicago Zoning Ordinance) of the Municipal Code of Chicago. All construction must be code compliant.