Tile Backsplash Installation: A Half Kitchen Face Lift

Discover how a simple new backsplash installation can elevate your kitchen’s style and functionality. In a popular Reddit DIY project, one creative homeowner added a modern backsplash to brighten their space without a major renovation.

By choosing the right materials, properly preparing the surface, and installing the tiles with attention to detail, you can achieve a sleek, customized look that reflects your personal taste. For guidance and professional tips on tiling, grout selection, and finish work, rely on our tried-and-true advice from past Chicago Handyman projects. Ready to enhance your cooking area? Let this expert-backed DIY inspiration be your roadmap to a successful new backsplash installation!

bLwhw9H
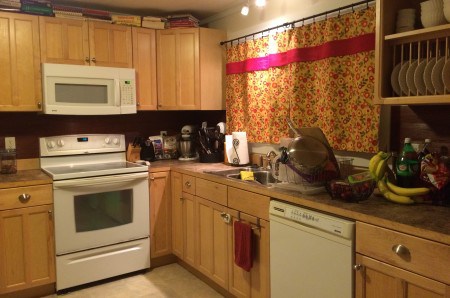
Before remodel by nixonneckweasel
0FuE05A
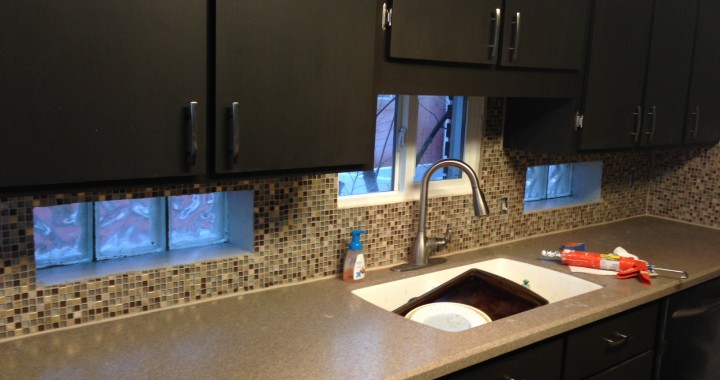
After remodel by nixonneckweasel

Everyone wants to have a gorgeous, gourmet kitchen and new backsplash installation just might be the trick. Some people don’t have the money or time to dedicate to a full makeover. Previously in Idea Corner, I posted some easy steps to upgrade an outdated bathroom. Now I’ll show how to take a kitchen from a simple eatery to a grand entertaining space.

5ghfm5t
Removal of backsplash by nixonneckweasel

Reddit user, nixonneckweasel, improved their kitchen drastically with just a couple of projects. The required supplies are:

  •  A hammer
  • A pry bar
  • Putty knives in multiple sizes
  • Concrete
  • Scrapers
  • Backsplash tiles
  • Grout
  • Painter’s tape
  • Paint/paint brushes

First, choose the paint color for the cabinets and tiles for the new backsplash. For a more modern look, follow nixonneckweasel‘s example and go for a black paint and smaller tiles in more muted colors.

3PIheeL
After paint and concrete application by nixonneckweasel

Next,  take out those dated backsplash tiles. Using a hammer, pry bar and putty knives, remove all the tiles above the countertops. Try as much as possible not to remove the mortar and concrete behind the tiles. But if that happens, don’t freak out! Just make sure to level the surface with concrete after the removal process is complete.

Following the tile removal, start to paint the cabinets. Make sure to apply painter’s tape around the cabinets so paint doesn’t get on the walls or backsplash area.

Once the paint has dried, feel free to put up the backsplash tiles. Once the tiles are attached to the wall, use grout to secure and seal the backsplash.

And with just 2 projects, a modern kitchen is created for just under $150.

S6unlAP
Final product by nixonneckweasel

Looking for a more drastic makeover? Contact Chicago Handyman for affordable prices on full kitchen remodels

Frugal Friday: A $10 Kitchen Remodel!

IMG_1222-e1423013988298-450x298

In the past, Idea Corner has shown you a Half-Bathroom Facelift and Half-Kitchen Facelift, but what about a $10 kitchen remodel? It’s now possible, thanks to Jennifer Collins!

This project will take no more than a day and add elegance on a bargain budget.

IMG_1204-450x450Here’s a low down on the supplies:

  • Peel & Stick Vinyl Flooring
  • Utility Knife
  • Ruler

Start by prepping the kitchen counters and backsplash area. Clean all surfaces and make sure to remove all outlet covers.

Begin peeling and sticking the vinyl flooring to the backsplash area. Depending on the look desired, cut down the slabs for shorter planks or leave them at the pre-cut length.

IMG_1208-e1423013244665-450x450

If left at the pre-cut length, there will still be some cutting with the utility knife involved. Measure the length and width of all outlet covers and moldings. Using these measurements, cut out the areas so outlets and moldings are accessible.

This vinyl backsplash will not only look expensive, but is easy to clean, waterproof and can be painted at any time to change the color.

So follow these easy steps and soon a basic kitchen will have a whole new life.

IMG_1207-e1423013662209-450x450

Want a more dramatic kitchen remodel? Give Chicago Handyman a call today for an affordable kitchen upgrade!