Old Home? These Quick, Easy Updates Will Blow Your Mind!

Sometimes a vintage touch brings interest to a home. However, if every room in a home is a remnant of the 60’s, 70’s or 80’s, it might be time for a remodel. If there’s time or no money for a full-blown renovation, check out these fixes to revamp a space provided by Kim Anderson!

Painting 

A new paint job can revitalize any room. Paint can be costly, but here’s a tip: check out the “Oops!” painting section. These paint cans were returned by customers, not because they didn’t work, but because they didn’t work for them. Pick up a few of these cans for less than $5 and watch the room transform.

Oops-Paint-Image


Counter Tops

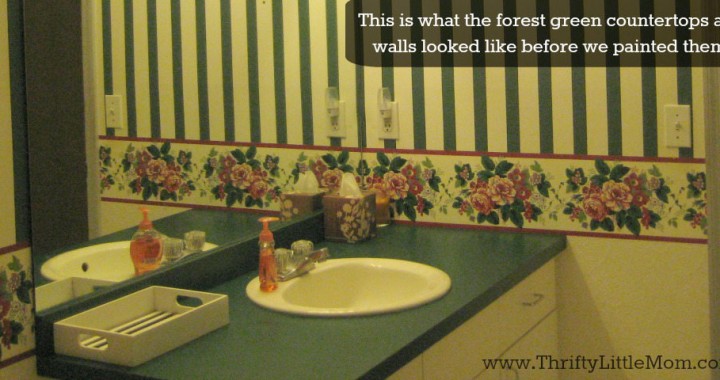
A new paint color on the walls not enough? For kitchens and baths, consider painting the countertops! There are products  made for painting countertops & Anderson says her countertop has lasted 3 years with barely any chipping.

Re-styling-your-older-home-without-remodeling-bathroom


Lighting

This last update will be the most expensive, but possibly the most rewarding. For between $40 & $150, new lighting in any room can change the brightness and sight lines of a room. Try a dome light in eating areas, new vanity lighting in bathrooms and updated ceiling fans in bedrooms.

Bathroom-Lighting


So don’t stress about renovation budgets or hiring a construction crew, try these simple fixes to restyle a home!


Ready for a large scale renovation? Call Chicago Handyman today! 


Top 5 Need To Know Tiling Tips

5wxw951f034fe71637

Getting ready to tile a bathroom shower? Maybe the kitchen floors need some revamping? Tiling is a fairly simple home project, but can seem daunting for novice home renovators. Well to ensure the project is done right the first time, here are 5 tips to absolutely follow:

1. Keep Those Tiles Dry- And Clean!


nqwky51f034ff466ae

Before beginning to place tiles in the desired pattern, make sure all the tiles are dry and clean. This will be a time and sanity saver throughout the course of the project.


2. Read The Directions On The Box!

everbuild_FWPOWGROUT1

Don’t be a fool- read the adhesive box directions. Just because The Property Brothers makes a kitchen tile install look simple doesn’t mean it is. View the box directions not as guidelines but as law.


3. On That Note- Wait The Full 24 Hours!

Mid_Tiling__jpg_465x600_q85

Any adhesive box will instruct to wait 24 hours until grouting the tiles of any home project. Not 12 hours, not 16 hours. Keep heartache out of the remodel, wait a whole day before finishing up the tiling project.


4. Use A Notched Trowel & Horizontal Patterns

PiBacksplash10

When applying adhesive and grout, there’s no need to get artistic or elaborate. Save that for craft time with the kids. Using a notched trowel, apply the material in horizontal lines, making sure to cover the tile entirely. No swirl shapes allowed!

5. Tiles Are Like Vampires, They Hate Sunlight

Cortico-Netos-ceramic-store-Lisbon-Portugal

For the love of all the DIY gods, do not store the tiles in direct sunlight before fixing them. A dry, clean room with no windows is preferred.


And for even more tiling rules, check out Joanna Johnson’s Golden Rules of Tiling.  

The Top 5 Ways To Add Color To Any Room!

In modern interior design, neutrals are always stressed as being the best pallet to go with. But not everyone can settle for a “blah” room. Enter… accent colors! These five tips from Buzzfeed will revitalize any room’s decor leaving it with a classy and colorful look.

1. Frame Up Some Color!

enhanced-buzz-3825-1341509784-16

Don’t leave picture frames bare, add some colorful construction paper as backing to standard or black and white photos.

2. Colorblock Shelves To The Rescue

enhanced-buzz-16452-1341509163-15

Whether in the living room, library or bedroom, organizing shelving items by hue will liven up all plain old built-ins.

3. Don’t Combat- Contrast!

enhanced-buzz-16443-1341510221-13

Those pesky neutrals mentioned before? Use them to their fullest potential! Contrast a bright color with a neutral for dramatic yet balanced style.

4. Scrounge Up Some Colorful Flooring

enhanced-buzz-31805-1341512214-17

Who says only walls or accessories can provide a burst of color? Technicolor rugs and flooring can liven up even the most bland rooms.

5. Stick To A Favorite!

enhanced-buzz-14942-1341511700-7

Whether cerulean calls or bright green beckons, utilizing the color in a few key places will definitely catch the eye.

Check out more ways to revamp old spaces at Chicago Handyman’s Idea Corner!

Don’t Buy A New Sink, Paint The Old!

Chicago Handyman has shared a fair share of bathroom remodeling ideas, but none as quite as simple as this one! With some simple paint and a few days of work, an 70’s sink nightmare can be brought into the 21st century.

Here’s the required materials:

  • Brush-on Epoxy Paint Kit
  • Top quality brush

To start this project, the sink will need more than a quick clean, it’ll require a full-on scrub down. In the paint kit, steel wool and a cleaner are usually provided. After making sure the sink is sparkling, it’s time to paint.

Screen Shot 2015-03-08 at 11.12.45 PM

Apply the first coat of epoxy paint. Use any brush strokes desired, just don’t leave drips! Wait 3 hours between coats, allowing the epoxy to set.

Screen Shot 2015-03-08 at 11.13.11 PM

Follow the first coat with a second, again allowing another 3 hours for the epoxy to set.

Screen Shot 2015-03-08 at 11.13.35 PM

If a third coat is necessary, another 72 hours has to elapse before it’s applied.

Once the coat dries, feel free to splash around in the sink! With no plumbing to refigure or vanity to install, an old fixture can revitalize a bathroom. No sweat equity necessary!

Screen Shot 2015-03-08 at 11.13.46 PM

For a step-by-step guide, check this out. And for a more extensive bathroom remodel, call Chicago Handyman today!