Removing drywall anchors is a common task in home improvement projects. Whether you’re redecorating or patching up holes, knowing how to take out these little fasteners is a handy skill.
Several easy ways to remove drywall anchors include using pliers, a screwdriver, or even pushing them through the wall. The best method depends on the type of anchor and how it was installed. Some can be unscrewed, while others might need to be pulled out or recessed into the wall.
DIY enthusiasts often face this task when hanging new shelves or moving picture frames. With a bit of patience and the right technique, anyone can learn to remove drywall anchors without causing too much damage to the wall. It’s a simple job that can make a big difference in home upkeep and decor.
Preparation and Safety
Getting ready to remove drywall anchors takes some planning. You’ll need the right tools and safety gear before starting. This helps make the job easier and keeps you safe.
Gathering the Right Tools
To remove drywall anchors, you’ll want a few key tools on hand. A screwdriver is essential for taking out screws. Pliers, especially needle-nose pliers, help grip and pull out stubborn anchors. A hammer can tap around the anchor to loosen it.
For tough jobs, a drill might come in handy. A utility knife can cut around painted-over anchors. Sandpaper smooths rough spots after removal. Having these tools ready saves time and frustration during the project.
Safety Precautions
Safety should always come first when working on home projects. Wear protective goggles to shield your eyes from dust and debris. This is super important when using power tools or hammering.
Keep the work area clear of clutter to avoid tripping. If using a ladder, make sure it’s stable on flat ground. When pulling out anchors, work slowly to avoid losing balance.
Dust from drywall can irritate lungs. Open windows for good air flow. A dust mask adds extra protection. Always unplug power tools when not in use to prevent accidents.
Removing and Repairing
Taking out drywall anchors can be tricky, but with the right tools and methods, you can get them out and fix the wall. There are different ways to remove anchors and patch up the holes they leave behind.
Types of Drywall Anchors and Removal Techniques
Plastic anchors are common and easy to remove. Just grab them with pliers and pull them out. For stubborn ones, push them into the wall first.
Metal anchors like toggle bolts need special care. Unscrew the bolt, then push the toggle part into the wall cavity. You can cover the hole later.
Threaded anchors and molly bolts can be tough. Try unscrewing them with pliers. If that doesn’t work, you may need to recess them into the wall.
For really stuck anchors, use a drill bit slightly bigger than the anchor to grind down its edges. This makes it easier to pull out or push in.
Patching and Smoothing the Wall
After removing anchors, you’ll need to fix the holes. Small holes from plastic anchors are easy – just fill them with spackle or joint compound.
For bigger holes, use a putty knife to apply drywall compound. Build it up in thin layers, letting each one dry before adding more.
Once the patch is dry, sand it smooth. Use fine-grit sandpaper and go slowly to blend the edges with the wall.
For the best finish, prime the patched area before painting. This helps the new paint match the rest of the wall.
Remember to clean up any dust from sanding before you paint. A damp cloth works well for this.
Hanging drywall is a key step in many home improvement projects. But how many screws do you need for each sheet? It’s a common question that can puzzle both DIY enthusiasts and pros alike.
The general rule is to use about one screw per square foot of drywall.
This means a standard 4×8 foot sheet needs around 32 screws.
The exact number can change based on where the sheet is going and how thick it is.
Proper screw placement is just as important as the number of screws used. Screws should be spaced 16 inches apart on walls and 12 inches apart on ceilings. Edges need screws every 8 inches to keep things secure. Getting this right helps prevent sagging and cracking, making for a smoother finish that lasts longer.
Choosing the Right Fasteners
Screws are best for most drywall jobs. They hold better than nails and are easier to remove if needed.
Pick the right screw length:
1 1/4 inch for 1/2 inch drywall
1 5/8 inch for 5/8 inch drywall
Use coarse-thread screws for wood studs and fine-thread for metal. Make sure screw heads are slightly below the surface without breaking the paper.
For extra strength, some pros use glue with screws. This can cut down on the number of screws needed.
Detailed Screw Placement Guidelines
Proper screw placement is key for strong, long-lasting drywall installation. The right spacing and number of screws keep walls and ceilings secure while avoiding issues like screw pops or sagging.
Drywall Screw Spacing Rules
On walls, space screws 16 inches apart in the field and 8 inches along edges.
For ceilings, use 12-inch spacing in the field and 7-8 inches on edges. Keep screws about 3/8 inch from panel edges to prevent crumbling.
Near doors and windows, add extra screws for added strength. Use a consistent pattern to make sure the drywall is well-supported all over.
The International Residential Code (IRC) sets these rules. They help stop problems like loose drywall or visible screw heads later on.
Calculating Screws Per Drywall Sheet
For a standard 4×8 foot sheet of 1/2-inch drywall, you’ll need about 32 screws. This follows the “4 screws per square yard” rule. Thicker 5/8-inch drywall needs more – around 40 screws per sheet.
Here’s a quick guide:
4×8 foot sheet (1/2 inch): 32 screws
4×8 foot sheet (5/8 inch): 40 screws
4×12 foot sheet (1/2 inch): 48 screws
Adjust these numbers based on room features like windows or built-ins. It’s better to use a few extra screws than too few.
Avoiding Common Errors
Don’t overdrive screws. This can break the paper surface and weaken the hold. Set screw heads just below the surface.
Avoid “screw pops” by not putting screws too close to panel edges or joints. These can push through later and ruin the wall’s look.
Don’t skip screws to save time. This can lead to loose or wavy walls. Stick to the spacing rules for best results.
Use the right screw length. For 1/2-inch drywall, 1 1/4 inch screws work well. For 5/8-inch sheets, go with 1 5/8 inch screws.
Lastly, don’t rely on adhesives alone. While they help, screws are still needed for a secure install that meets building codes.
Choosing the right wall material can make a big difference in your home. Plaster and drywall are two popular options. Each has its own pros and cons.
Plaster has been used for centuries. It’s known for its durability and sound-proofing qualities. Drywall is a newer option. It’s easier to install and costs less.
The main difference between plaster and drywall is their composition and installation process. Plaster is a wet mixture applied in layers, while drywall comes in pre-made panels. This affects how they look, feel, and perform in your home.
Fundamental Composition of Plaster and Drywall
Plaster and drywall are two distinct materials used for wall construction. They differ in their ingredients, application methods, and manufacturing processes.
Plaster: Ingredients and Application
Plaster is a mixture of lime, sand, and water. Some types also include gypsum. Builders apply plaster in layers to create smooth walls.
The first layer, called the scratch coat, is rough. It helps the next layers stick better. The second layer is the brown coat. It evens out the surface.
The final layer is the finish coat. It gives the wall its smooth look. Plaster can be tinted or painted once it dries.
Applying plaster takes skill. It’s a wet process that needs time to dry between coats. This can take several days to complete.
Drywall: Core Material and Manufacture
Drywall is made of gypsum pressed between two sheets of paper. The gypsum core contains additives that make it fire-resistant.
Factories produce drywall in large sheets. These sheets come in standard sizes, usually 4 feet wide and 8 to 12 feet long.
The paper on each side of the drywall serves different purposes. The front side is smooth for painting. The back side is rougher to help it stick to the wall.
Installing drywall is faster than plastering. Workers cut the sheets to fit and use drywall screws to secure them to wall studs. They then cover the seams with tape and joint compound.
Durability and Performance Comparison
Plaster and drywall differ in their longevity and ability to withstand wear and tear. Each material has unique strengths that impact its durability over time.
Longevity of Plaster
Plaster walls can last for decades with proper care. They resist cracks and dents better than drywall due to their harder surface. Plaster also provides superior soundproofing and insulation.
The thickness of plaster allows for deeper textures and design details. This makes it popular for historic restorations and high-end homes.
Plaster does have some drawbacks. It can be prone to water damage if exposed to moisture. Repairs are often costly and require specialized skills.
Drywall Resistance and Quality
Drywall is more vulnerable to dents and holes than plaster. Its paper surface can tear if hit with force. However, drywall is easier and cheaper to repair when damage occurs.
Modern drywall comes in moisture-resistant and fire-resistant varieties. These improve its durability in bathrooms and other high-risk areas.
Drywall installation is faster and less messy than plastering. This makes it the go-to choice for most new construction projects.
The quality of drywall can vary. Higher-grade products offer better soundproofing and impact resistance. Proper installation is key to maximizing drywall’s performance.
Installation and Labor Considerations
Plaster and drywall have different installation processes that affect time, skill, and cost. The choice between them depends on project needs and available resources.
Timeframe and Skill for Plaster
Plastering takes more time and skill than drywall installation. A professional plasterer needs several days to finish a room. The process involves multiple layers and drying time between coats.
Mixing plaster requires precision. Applying it evenly takes practice and expertise. Plasterers often train for years to master the craft.
The finish coat needs careful smoothing to achieve a flawless surface. This step can be time-consuming but results in a high-quality look.
Ease of Drywall Installation
Drywall installation is faster and simpler than plastering. A team can hang and finish drywall in a room within a day or two.
The process involves cutting panels to size, attaching them to studs, and taping seams. Joint compound covers the seams and screw holes.
Drywall doesn’t need special mixing skills. Many homeowners can handle basic drywall work themselves.
Sanding the dried joint compound creates a smooth surface. This step can be dusty but is less labor-intensive than plaster finishing.
Cost and Accessibility Differences
Plaster and drywall differ in their market availability and overall costs. These factors can impact a homeowner’s choice between the two materials for their walls and ceilings.
Market Availability of Plaster and Drywall
Drywall is widely available at most home improvement stores and building supply centers. It comes in standard sizes and thicknesses, making it easy to purchase and transport. Many contractors and DIY enthusiasts can find drywall materials quickly.
Plaster materials are less common in retail settings. Specialized suppliers often carry plaster products. Finding skilled plasterers can be challenging in some areas, as the trade is less prevalent than drywall installation.
Comparative Cost Analysis
Drywall is typically less expensive than plaster for both materials and labor. A square foot of installed drywall can cost $2 to $3, while plaster may range from $4 to $6 per square foot.
Plaster installation takes more time and skill, leading to higher labor costs. It often requires multiple coats and drying time between applications. Drywall goes up faster, reducing labor expenses.
Long-term maintenance costs can vary. Plaster tends to be more durable, potentially saving money on repairs over time. Drywall may need more frequent touch-ups or replacements in high-traffic areas.
Frequently Asked Questions
Plaster and drywall have key differences in cost, identification, installation, and modern usage. Let’s explore some common questions about these wall materials.
What are the key differences in cost between plaster and drywall?
Plaster typically costs more than drywall. The materials for plaster are pricier, and it takes longer to install. Skilled plasterers command higher wages too.
Drywall is cheaper to buy and quicker to put up. This makes it a more budget-friendly choice for many projects.
How can one tell if a wall is made of plaster or drywall?
Plaster walls feel harder and smoother when tapped. They often have slight curves or waves.
Drywall feels hollow when knocked on. It has visible seams every 4 feet where panels meet.
A small hole in plaster reveals multiple layers. Drywall shows paper backing and a gypsum core.
What considerations should be taken into account when hanging pictures on plaster versus drywall?
Plaster needs special anchors or screws. It’s brittle and can crack easily.
Drywall allows for regular picture hooks or nails for lighter items. Heavier objects need wall anchors.
Test the wall’s strength before hanging anything heavy on either surface.
How do plaster and drywall compare when it comes to ceiling installations?
Plaster ceilings are heavier but offer a smooth, seamless look. They’re great for custom designs and curves.
Drywall ceilings are lighter and faster to install. They work well for flat surfaces and can be textured.
Both need proper support to prevent sagging over time.
In what ways do plaster and drywall compounds differ from each other?
Plaster compound is made of lime, sand, and water. It hardens through a chemical reaction.
Drywall compound, or joint compound, is gypsum-based. It dries through evaporation.
Plaster is tougher and more durable. Drywall compound is easier to sand and shape.
Why is drywall more commonly used today in place of plaster?
Drywall is faster to install, which saves time and money. It’s also easier to repair and modify.
Fewer workers today have the skills needed for plastering. This makes drywall a more practical choice.
Drywall offers good fire resistance and insulation at a lower cost than plaster.
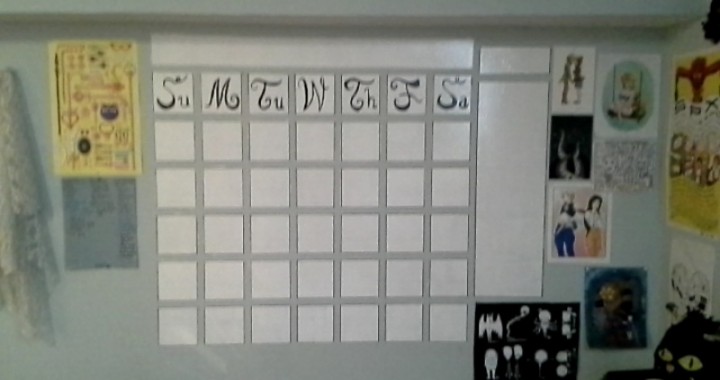
Some people need more reminders than others to stay on schedule. Sure there are phone notifications or daily planners to keep on track, but this dry erase calendar will definitely do the job. All that’s required for this project is dry-erase paint, painter’s tape, black acrylic paint and black marker to bring this large scale creation to life.
Using a calendar as a guideline, create a grid for the month, days and dates to be written in. Draw this outline on the wall in pencil and a ruler or go straight for the painter’s tape and a ruler. For extra flair, add a notes section like Reddit user, princessdoki, to keep track all tasks for the month.
Once the grid is outlined, apply an even coat of dry erase paint over the squares. Unfortunately, the paint takes 7 days to dry. Use this time to paint the days of the week into the top 7 squares.
After waiting a week, feel free to add the month, dates and any notes. This week-long project will not only help manage schedules and “to-do’s,” but add visual interest to any wall in a home.
For any project involving the walls in your house, you’ll need the best drywall application possible. Call Chicago Handyman for all your drywall needs!