A Tree Any Last Minute Christmas Decorator Can Pull Off

Merry Christmas Eve!

Screen Shot 2014-12-23 at 2.34.28 AM

First step of Spiral Christmas Tree by twistedtreeartist

I don’t know about you, but Christmas always seems to come up faster than I expect. And if you didn’t get the chance to go pick out a full evergreen or drag that fake tree out of storage, I have a quick, simple and cheap solution for you: The DIY Spiral Christmas Tree.

The supplies for this project (created by Reddit artist twistedtreeartist) are all items you probably have lying around your house. A simple square table, fishing line, a ceiling hook, wrapping paper and any and all Christmas decorations you have will do just fine.

Screen Shot 2014-12-21 at 9.49.04 PM

Base design by twistedtreeartist

Once you place the table where you want to display your tree, you will want to wrap the table’s surface in wrapping paper. Silver, gold or blue with a snowflake design, any wrapping paper will do. Then you will want to screw the hook in the ceiling securely. Make sure you align the center of the table with the center of where you want the tip of your tree to go for the most streamlined look.

To begin forming the shape of the tree, wrap the fishing line around the bottom of the tree, up and around the hook and then tie a knot to close the initial loop. Do not cut the fishing line. You will continue to wrap the fishing line around the table and hook until you have created a base for the tree.

In order to create spaces to hang your decorations, you will need to create spider web designs within the vertical lines. On the outer cone of the tree, you should pull together a few of the vertical strings, wrap them with more fishing line and then let it go, moving on to the next set of vertical strings. To secure the web, tie a few knots here and there to strengthen the web.

Screen Shot 2014-12-21 at 9.48.34 PM

Final Design by twistedtreeartist

Now comes the best part: the decorating! If you’re going for a m0re modern look, use some silver garland and smaller blue or green lights. For the more traditional decorator, green garland with multi-color lights will look great as well. Wrap as much or as little as you want!

When you plug in the Christmas lights and turn off the overhead lighting, you will have a statement holiday tree that has the illusion of floating in space.

And to think, hours ago, you had a bland holiday-less space!

Need even more lighting for your holiday party? Check out Chicago Handyman’s electrical services!

Revamping The Standard Coffee Table

Screen Shot 2014-12-19 at 8.43.20 AM

Happy Holidays!

I’ve been thinking a lot about how to spice up an everyday DIY project. After all, there are a lot of examples of how to make your own coffee table, but how can you make one that is not only functional but a statement piece?

Tracing tree design onto wood by

Tracing tree design onto wood by iezugod

And that’s when I came across iezugod‘s tree design coffee table. This beautiful piece is not only intricate, but a pretty simple design to create on your own.

When you create the tree stencil, you want to make sure that it is large enough to be noticeable but not overpowering the rest of the table. Then you will trace the design on plywood with a pencil. You will want to cut the wood to the tree shape.


Screen Shot 2014-12-23 at 2.16.22 AM

Base & top of coffee table by iezugod


You can create the frame of the table before or after you create the tree shape. You will need 2×4’s for the legs and supports as well as screws for additional corner supports. You will then need a plywood board which you will attach trim to for a more refined look. The trim is also important so you can inlay plywood boards to surround the tree design. You will need to draw the same tree design on the boards so you can insert the tree in the center of the table. Then you will cut the design and remove the left over wood from the piece.

The next step is to stain the table in a dark cherry color. Then you will place the tree in the center inlay you have created. Once the parts are all assembled, apply polyurethane to the table top to add gloss to your piece.

Adding a stain to the table by iezugod

Adding a stain to the coffee table by iezugod

With that final touch not only have you added another surface to your living room, but a gorgeous art piece all your guests will ask about it.

And you can proudly say, “I made that!”

Looking to renovate the living room you can put this table in? Check out Chicago Handyman’s drywall and painting services! 

Custom Bay Window Seat

Screen Shot 2014-12-19 at 6.59.42 AM

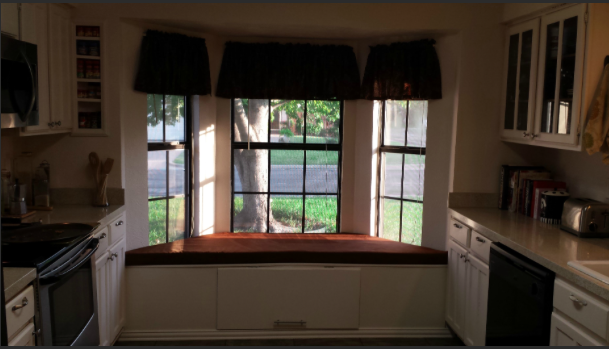
Finished Product by JacobVandagriff

Maybe you’re looking to add some seating to your living room. Or maybe you want to sit comfortably, drink your morning coffee and look out the window at the morning sky. No matter what your reason, a window bench seat can be a great addition to your home. To build your own may take a few days, but it is a creative solution for any room in your home.

custome bay window seat

This kitchen bay window, was wasted space until it was transformed in to a custom bay window seat.

Before getting started on your project, you will have to run a few errands for supplies. You will need some 1/4″ and 1/2″ plywood boards and several pressure treated 2X4’s for the frame and supports. Hardware for the storage drawer, white paint and paint brushes will also be required. For the cushion, you will need pre-cut memory foam and a durable fabric of your choosing.

First you should lay your first 2X4 on the outer edge of where your window seat will be. You will want to make sure that it is securely attached to the floor as it will be providing much of the support for the bench. Then you will want to cut the remaining 2X4’s to size to form the frame. This requires 3 other boards to frame the floor area by the window. Using an impact drill and wood screws, you should attach 8 boards vertically to meet the window sills, 3 boards to frame the window sills and another 4 boards to provide support for the cushion.

After the supports are all in place, you will want to use a circular and miter saw to fit the plywood boards of both the top and front of the seat. You will want to cut out 2 squares for the storage underneath the seat. You will want to add wood filler in the storage areas as well for more support.

For a more clean cut look, you can attach trim to the top and bottom of the window seat. Then you can start applying paint of your choosing, though I would suggest matching it to the color of the windows in your home.

bay window remodel

Finishing corners adds style and elegance to any remodeling project. A trim joining the base with the floor creates a beautiful finishing touch.

To finish up the project, you will add the door to the storage area. Attach the door to your window seat and screw in the hardware you bought earlier in the process.  After upholstering the memory foam with the fabric you chose, you place it on top the seat. For added protection, spray some waterproofing solution on the cushion.

Though not for the faint of heart, this is a project doable even for the novice DIY-er. For a step-by-step guide on this project, check out Reddit user JacobVandagriff ‘s imgur album.

And for your more intense home projects, call Chicago Handyman for low prices for all your home improvement needs.

Custom Bay window seat

Mural Painting Brings Rooms to Life

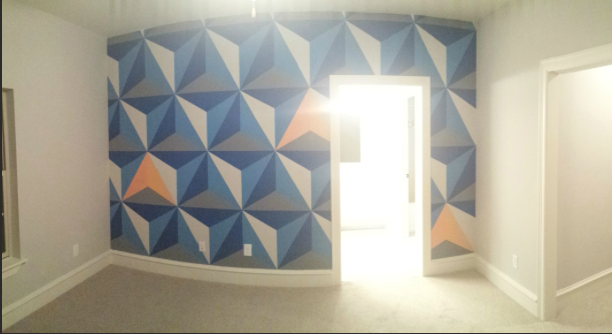
Finished product by loganza

Finished product by loganza

No matter how big or small, no room in your house should ever be called boring. And if you don't have the budget or time to pick out some eclectic furniture or interesting artwork, a feature wall just might be for you. With a clear vision and bit of paint you can breathe some life back into your ignored walls.

Screen Shot 2014-12-23 at 1.38.10 AM

Taping off design by loganza

When choosing the room in your house to add a feature wall to, make sure that the other 3 walls are painted with a neutral or muted color. You don't want houseguests to be distracted from all your hard work! Choose the wall that you want your eye to be drawn to and get started.

First, you're going to want to get your materials together. Depending on how intricate the design you choose, you might need more supplies. For any scale of work you will need a pencil to sketch out the design, painter's tape to define where the design will be painted and the various colors of paint you will want to use.

Next, you will need to choose your design. For example, Reddit user, loganza, wanted a more geometric design. But whether you're an artist or a mural novice, you will want to draw your design with a pencil and a straight edge yardstick. Getting the measurements evenly distributed will definitely be the hardest part, but will make the painting later much easier.

Adding blue to the design by loganza

Adding blue to the design by loganza

Once you have the design all drawn out, you will want to tape out all the sections. You can do this all at once or as you paint each section. Choose bright colors that compliment each other as well as the other walls in the room.

After all the painting is done, peel off the tape and allow the paint to dry.

And voila! You now have a feature mural that any homeowner could be proud of!

Adding the orange accent by loganza

Adding the orange accent by loganza

Need multiple rooms in your house painted? Give us a call for a free estimate on all your Chicago Mural Painting needs.

Enhancing Your Bedroom For Just $50!

Screen Shot 2014-12-13 at 12.18.44 AM

Finished product by immaverb

Not everyone can afford to create a luxurious, top-of-the-line bedroom oasis. However, for those of us renovating on a budget, there’s a simple way to add some indulgence to your master or guest bedrooms. With just a few simple steps, you can make your own extravagant headboard and add some hotel flair at a motel cost.

And all you need is $50! These are the items you’ll need: a particle board fitting the width of your mattress frame, five 2-by-6 boards, spray adhesive, painter’s tape, a durable fabric of your choosing and to add some glamour, like this Reddit user, immaverb, purchase some strip beading to define a border for your headboard.

This task is also amendable for any skillset. From a contributor to Better Homes & Gardens to someone who just mastered how to hit a nail with a hammer, anyone can create their own lavish headboard.

Screen Shot 2014-12-23 at 1.14.54 AM

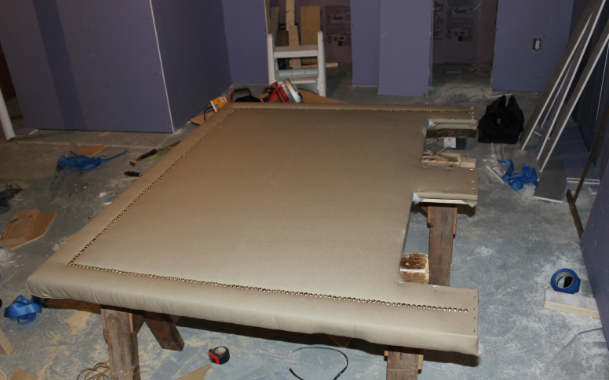
Constructing the frame by immaverb

Once you’ve measured your particle board to size, adhere the five 2-by-6 boards to function as the supports frames and legs. Apply spray adhesive to the front of the head board, add a layer of foam and keep adding until you reach the consistency you desire. Don’t forget to wrap it around the frame or you could end up with a pretty sloppy design. Once all the foam has been added, go ahead and staple it to the frame for extra support. Add the fabric and staple it to the back of the board’s frame, making sure to smooth out any wrinkles in the fabric. And presto, you got yourself a headboard!

Screen Shot 2014-12-23 at 1.18.11 AM

Prepping for beading by immaverb

Don’t think I forgot about you classier DIY-ers: To add the strip beading, all you need to do is secure painters tape around the edges of the headboard to ensure a straight line and add the beading as directed.

And installation? That’s the easiest part! Place it behind your bed frame and let the weight of the bed do the rest.

Take a step back and admire your work. In less than a day’s time, you’ve added sophisticated to the adjectives that could be used to describe your bedroom.

And if you’re still looking to add more glitz to your bedroom after this project, check out Chicago Handyman’s deals on home improvement.

Screen Shot 2014-12-13 at 12.19.37 AM

Beading by immaverb

Click here for a step-by-step photo gallery for this project.