Custom Barn Door Installation

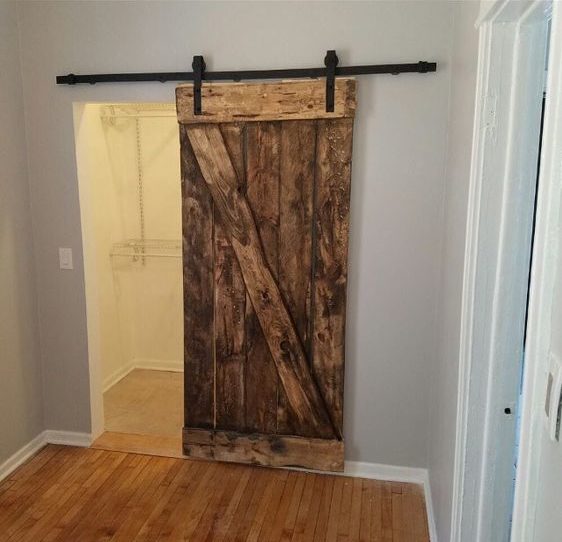
One of my favorite clients was updating her rental property in the west Pilsen neighborhood – close tot he Lagunitas brewery and the Cinsespace industrial park. She requested I make and install a barn door for her. This custom barn door fabrication project was one of my favorite pieces.

I used 2×6 pine so the door would be light weight. Using a claw hammer, an angle grinder and some wood stain, I weathered the boards and assembled them as pictured above.

I used a splotchy staining technique and 2 different colored stains to bring out some character in the wood. I found a basic sliding door hardware set up on amazon and the result was great.

If you are thinking about a custom barn door fabrication project, please let me know. I really enjoy hearing about custom project ideas.

Preparing for a winter storm

With a record Low temperature approaching Chicago, It is a good Idea to prepare your home to increase comfort and reduce energy costs. the biggest culprit is Heat Loss – places your home is letting warm air escape, or cold exterior air enter. Here are a few key areas a home owner can address on their own.


  1. Doors – If you can see daylight, you have heat loss. Run your hand along the cracks of your Sliding doors and entry doors. I you can feel cold air – you have heat loss. Quick fix – Tape. Duct tape or packing tape will instantly reduce your heat loss and save on your electric bill.
  2. Windows – Be sure to close storm windows. According to EnergyStar.gov, replacing single-pane windows with ENERGY STAR qualified storm windows can save you up to $465 a year on energy bills. Closing curtains and blinds will also create a barriere between you and the cold. Plastic on your windows is also a great way increase your comfort and reduce your energy bills
  3. Bath and Kitchen Exhaust fans – Most kitchen and bath exhaust fans vent to the exterior of your home. Exhaust fans can remove 30% of your homes heat in One hour according to some estimates. If your vent does not include a damper – your vent could be pulling heat out of your home even when it is not running.

Chicago Handyman can provide home energy audits if you are ready to increase the comfort of your home and decrease your energy consumption. Bundle up out there!

Hide Any Ugly In The Home With A Hinged Canvas

IMG_0888

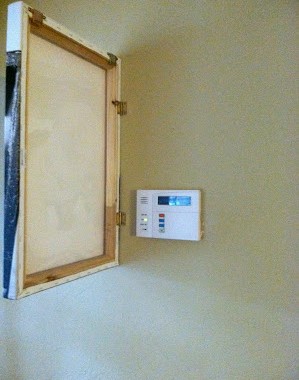
Not every necessary utility in a home is cute to look at. Fire alarms? Thermostats? Security systems? Those clunky squares aren’t a good look.

Luckily, The Third Boob has a great idea to hide those unsightly objects, a hinged canvas of any painting or photo. In just a few steps, the walls will look great and these systems will be easily accessible.

Start by gathering these materials:

  • Chosen canvas
  • Two flat hinges
  • Screw driver

After picking out the perfect painting of a sunset or photo of the family, attach two flat hinges the top and bottom of one side of the canvas. Once attached to the canvas, secure the hinges to the wall. Make sure to screw the hinges tightly to ensure the safety of the system and stability of the canvas.

IMG_0890

IMG_0891

And that’s it! Enjoy large scale beauty without any of the nuisances of utilities cluttering up wall space.

IMG_0889

Ready For New Flooring? Look No Further Than This Floating Laminate Install Tutorial!

Laminate flooring installation

There are many reasons why people are opting for laminate over hardwood flooring these days. Setting aside cost, laminate has more durability over most hardwood options. And it doesn’t hurt that laminate is as easy on the eyes as it is to install. And for the simplest installation of floating laminate flooring, look no further than this tutorial from One Project Closer.

Here’s what’s needed to get this project done:

  • Laminate flooring
  • Plastic Underlayment
  • Shoe molding
  • Molding adhesive
  • Thresholds
  • Miter saw
  • Table saw
  • Jig saw
  • Coping saw
  • Utility knife
  • Level
  • Hammer or rubber mallet
  • Pry bar
  • Multitool or flush-cut saw
  • Finish nail gun
  • Compressor

This may seem like a long list, but don’t let the length fool you, this project can be done by most novice home improvers. Let’s get started!

Begin by preparing the subfloor, making sure that the surface is level and acclimated to the climate of the room. Then plan out how the boards will lay in the room, making sure the planks will be uniform and equal.

DSC_0056Now it’s time to lay the plastic sheeting. These sheets should be running tight along the walls and secured with the adhesive on the bottom of each sheet.

Time to lay the boards! Make sure to leave a 1/4″ gap around the perimeter for any expanding or contracting that might occur in the wood. It’s important to have tools on hand to cut the pieces to size, especially when it comes to door jambs and doorways.

DSC_00631

DSC_00571

Once all the locking tongue and groove floor boards are in place, focus on the shoe molding and threshold pieces.

For the shoe molding, use a nail gun, making sure to nail into the baseboard. For the threshold pieces, only gluing with molding adhesive is necessary.

Floating floor installation base shoe

laminate flooring installation chicago

When complete, marvel not only at the time and money saved, but the sophisticated look achieved! Are you in need of Flooring installation in Chicago for laminate, hardwood or LVP, Give us a call or scroll to the top to fill out out estimate form.