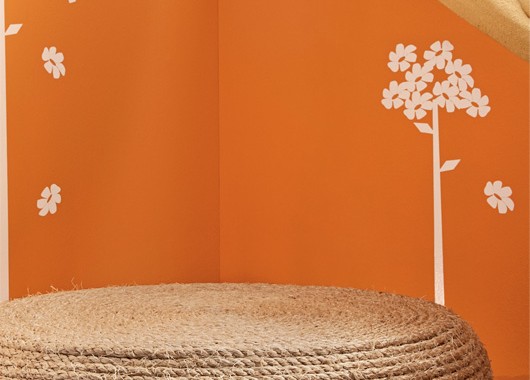
Revitalize Any Tire Into A Rope Ottoman!

rope-ottoman-final

Now that winter’s over, it may be time to change a car’s tires. However, don’t simply recycle those away. Instead, revitalize one of those tires into a modern, stylish rope ottoman. In just a few simple steps from Handimania, anyone can build an eco-friendly ottoman and bring a home’s interior design to a whole new level. 

rope-ottoman-step01

Get together these supplies:

  • Tire (New or Old)
  • 6mm MDF cut into two 55cm diameter circles
  • Drill
  • Screwdriver
  • 6 screws
  • Twisted Cord
  • Glue Gun
  • Cloth
  • Scissors
  • Brush Sealer

Start by thoroughly cleaning the tire with a cloth. Then drill one MDF into the tire at three points on the edge of the circle, making sure to puncture through the rubber of the tire. Follow this up by tightly screwing in screws to all three holes. Repeat the previous steps on the other side of the tire.

rope-ottoman-step03

Now comes the rope! Take the hot glue gun and adhere some glue into the center of the circle. Press the tip of the rope to the center and begin snaking the rope around the center in a circular motion.

rope-ottoman-step05

Once the top is covered, continue roping around the edge of the tire, tightly fastening the rope to the edge. Then turn the tire over and follow this process through. Cut off the rope once the whole tire is coated completely.

rope-ottoman-step06

rope-ottoman-step08

Finally, seal off the ottoman with a brush and place it anywhere in a home.

rope-ottoman-step09

The Best Way To Reuse Old Picture Frames

DIY-Frame-Shelves-500x750
Everyone knows the struggle: too many picture frames, not enough photos. After all, why print out those memories when there’s the instant gratification of Facebook and Instagram likes and comments? Well, struggle no more! Get ready to put those picture frames to use with these frame shelves.

Start by removing the glass, backing and hardware from all the frames intended for this project. Next, gather some 1×4 boards and cut them to size to make the sides of the the shelving box.

Glue-for-frame-500x750

Building-a-frame-shelf-500x670

To form the box, add lines of Gorilla glue to each side and nail each side together. Then apply wood glue to the back of the frame and lay it on top of the box. Nail 1 1/4″ nails through the frame and into the box to secure the shelf together.

Box-for-Frame-Shelf-500x750

Nail-Frame-to-Box-500x750

Frame-Shelf-How-To-500x750

Before painting the shelf to match the frame, fill any holes with wood filler. Use spray paint to apply the shelving’s coat of paint.

When dry, adhere at least 3 command strips to the back of each shelve.

Command-Strips-500x750

Lastly, hang them on the desired wall. Enjoy these stylish and eco-friendly shelves in any home today!

For a more comprehensive overview of the frame shelve project, check out Shanty 2 Chic.

Reuse Flooring & Create A Floating Headboard

diy-headboard-with-led-lighting_2

Reduce, Reuse, Recycle does not have to be boring. It can even be stylish. Following these simple steps from Remove & Replace, anyone can make an awesome, innovative floating headboard. All that’s needed are supplies from a previous project and a couple hours of work:

To begin, get these materials:

  •  Leftover walnut flooring
  • 1/2″ MDF backing
  • Oak wood trim
  • 24″ stud mounted French cleats
  • 15′ of string LED lighting
  • Wiring to a dimmer switch

Start by mounting the slab of walnut flooring to the MDF backing. Then nail stud mounted cleats in the center of the area where the headboard will go. Follow this with nailing the oak wood trim to the border of where the slab will go.

diy-headboard-with-led-lighting_4


Using attach brackets, add the LED lighting to the trim. Once the LED lighting is plugged in and the wiring is attached for the dimmer. Finally, mount the walnut flooring on MDF backing on the trim.

diy-headboard-with-led-lighting_5

When this is completed, this floating headboard will not only make the room look more modern, but add another light source to a bedroom.

diy-headboard-with-led-lighting_1