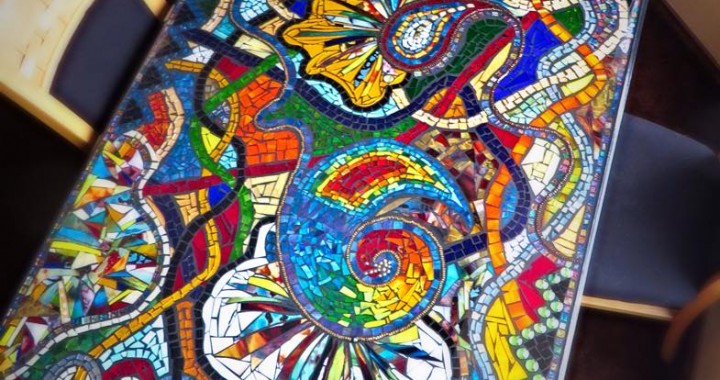
A Mosaic Table To Accent Any Room

mhh7hpw

Final product by am_i_man_or_muppet

OfC890w

Adding the molding by am_i_man_or_muppet

Some tables are supposed to be basic surfaces to eat on. A mosaic table is not one of them. While a mosaic table can be eaten on, it will also add an artistic flair to any room in a home. Don’t worry about being an expert craftsperson either. With a simple surface, moulding, wood glue, a brad nailer, glass scraps, epoxy resin and grout, a mosaic table can be made by even the most amateur home improvers.

First, attach the molding to the corners of the table. This creates a border for the mosaic to be placed in. All the molding should be cut at a 45 degree angle beforehand. Then using a brad nailer and wood glue, secure the molding to each side of the table.

EqIfRg2

In process design by am_i_man_or_muppet

Depending on how fluid or particular the design, there may be a period of sketching on the table surface. Reddit user, am_i_man_or_muppet, preferred to lay glass and beading as they went, allowing the end project to surprise them. Glue down the glass and bead pieces with any type of glue on hand. Arranging the glass and beading is the longest part of the process but also the most enjoyable.

CiwO5tu

The grout-y mess by am_i_man_or_muppet

When all the pieces are glued down, it is time for the grouting to begin. This will be a messy, grout-y process but totally worth it. The grout should be all over the glass by the end of the application. To keep the grout moist, spray it with water while you squeegee it off. Once all the grout is removed, pour a layer of epoxy resin to seal in the pieces of glass and beading.

All that’s left to do is find a place for this piece of art-slash-furniture. Enjoy!

Frugal Friday: A $10 Kitchen Remodel!

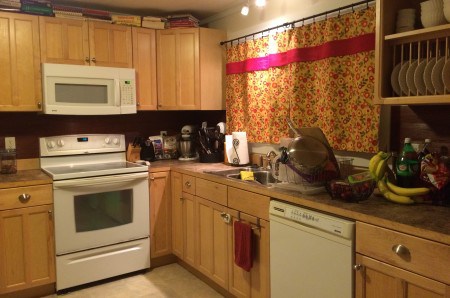
IMG_1222-e1423013988298-450x298

In the past, Idea Corner has shown you a Half-Bathroom Facelift and Half-Kitchen Facelift, but what about a $10 kitchen remodel? It’s now possible, thanks to Jennifer Collins!

This project will take no more than a day and add elegance on a bargain budget.

IMG_1204-450x450Here’s a low down on the supplies:

  • Peel & Stick Vinyl Flooring
  • Utility Knife
  • Ruler

Start by prepping the kitchen counters and backsplash area. Clean all surfaces and make sure to remove all outlet covers.

Begin peeling and sticking the vinyl flooring to the backsplash area. Depending on the look desired, cut down the slabs for shorter planks or leave them at the pre-cut length.

IMG_1208-e1423013244665-450x450

If left at the pre-cut length, there will still be some cutting with the utility knife involved. Measure the length and width of all outlet covers and moldings. Using these measurements, cut out the areas so outlets and moldings are accessible.

This vinyl backsplash will not only look expensive, but is easy to clean, waterproof and can be painted at any time to change the color.

So follow these easy steps and soon a basic kitchen will have a whole new life.

IMG_1207-e1423013662209-450x450

Want a more dramatic kitchen remodel? Give Chicago Handyman a call today for an affordable kitchen upgrade! 

Hide Any Ugly In The Home With A Hinged Canvas

IMG_0888

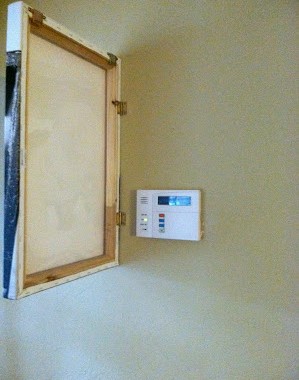
Not every necessary utility in a home is cute to look at. Fire alarms? Thermostats? Security systems? Those clunky squares aren’t a good look.

Luckily, The Third Boob has a great idea to hide those unsightly objects, a hinged canvas of any painting or photo. In just a few steps, the walls will look great and these systems will be easily accessible.

Start by gathering these materials:

  • Chosen canvas
  • Two flat hinges
  • Screw driver

After picking out the perfect painting of a sunset or photo of the family, attach two flat hinges the top and bottom of one side of the canvas. Once attached to the canvas, secure the hinges to the wall. Make sure to screw the hinges tightly to ensure the safety of the system and stability of the canvas.

IMG_0890

IMG_0891

And that’s it! Enjoy large scale beauty without any of the nuisances of utilities cluttering up wall space.

IMG_0889

Ready For New Flooring? Look No Further Than This Floating Laminate Install Tutorial!

Laminate flooring installation

There are many reasons why people are opting for laminate over hardwood flooring these days. Setting aside cost, laminate has more durability over most hardwood options. And it doesn’t hurt that laminate is as easy on the eyes as it is to install. And for the simplest installation of floating laminate flooring, look no further than this tutorial from One Project Closer.

Here’s what’s needed to get this project done:

  • Laminate flooring
  • Plastic Underlayment
  • Shoe molding
  • Molding adhesive
  • Thresholds
  • Miter saw
  • Table saw
  • Jig saw
  • Coping saw
  • Utility knife
  • Level
  • Hammer or rubber mallet
  • Pry bar
  • Multitool or flush-cut saw
  • Finish nail gun
  • Compressor

This may seem like a long list, but don’t let the length fool you, this project can be done by most novice home improvers. Let’s get started!

Begin by preparing the subfloor, making sure that the surface is level and acclimated to the climate of the room. Then plan out how the boards will lay in the room, making sure the planks will be uniform and equal.

DSC_0056Now it’s time to lay the plastic sheeting. These sheets should be running tight along the walls and secured with the adhesive on the bottom of each sheet.

Time to lay the boards! Make sure to leave a 1/4″ gap around the perimeter for any expanding or contracting that might occur in the wood. It’s important to have tools on hand to cut the pieces to size, especially when it comes to door jambs and doorways.

DSC_00631

DSC_00571

Once all the locking tongue and groove floor boards are in place, focus on the shoe molding and threshold pieces.

For the shoe molding, use a nail gun, making sure to nail into the baseboard. For the threshold pieces, only gluing with molding adhesive is necessary.

Floating floor installation base shoe

laminate flooring installation chicago

When complete, marvel not only at the time and money saved, but the sophisticated look achieved! Are you in need of Flooring installation in Chicago for laminate, hardwood or LVP, Give us a call or scroll to the top to fill out out estimate form.