The Best Eco-Friendly Flooring: Cork

Hardwood floors are a staple in most home renovations nowadays. But this flooring can often be harmful to nature. However, there is an attractive, easily installed alternative that not only does not hurt the tree but adds interest to an otherwise traditional home. This material is cork flooring.

Though not ideal for bathrooms, this flooring can function in every other room of the home. And it can be easily installed over tile, concrete or most other original flooring in the home.

cork-floor-2

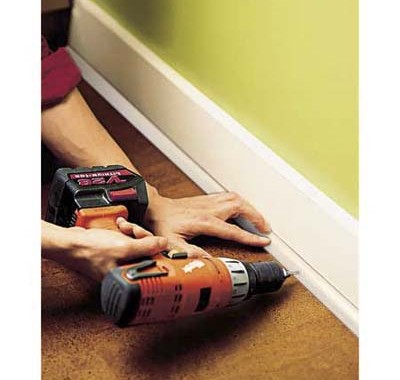
Begin installing cork flooring by placing a cork plank on top of the threshold and cut away trim from the doorstops on either side of the door above the threshold. Remove any cabinet toe kicks and edges of  wall casings.

cork-floor-5

Then lay cork planks along the longest uninterrupted wall, leaving 1-inch for expansion. Start laying the planks and gently press down until the tongue and groove of the planks click together. Do this until the first course is laid. Place 1/2″ spacers on the floor and start to slide them in. Following filling the space, begin to mallet the planks into place.

cork-floor-7

Finally reinstall any trim, toe-kicks or doorstops that were initially removed in the cork flooring process.

cork-floor-1

No finishing required and a whole new room for even more eco-friendly home solutions!

For a complete walk-through, check out This Old House.

And for even more flooring solutions, contact Chicago Handyman today!

Add Green Style To A BackYard With A Window Frame Greenhouse

FQO5MM9FTVVI0HD.MEDIUM

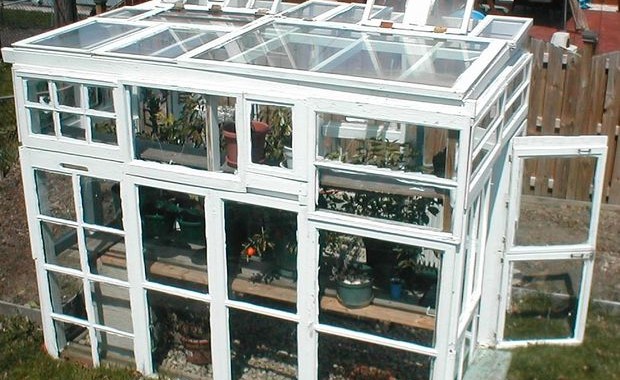
A greenhouse can be a great addition to any blank canvas of a backyard. But there’s no need to spend a bunch of money on products. After all, the best way to be the most eco-friendly is to re-use and recycle materials. This window frame greenhouse does this in spades.

Here’s the materials required:

  • Old window frames
  • Lumber
  • Screws
  • Caulk
  • Latches

Once enough window frames have been gathered, create a frame for them to fit in. Use 2X4’s for the studs and 4X4’s for corner posts. There has to be at least 14″ of the stud to be placed in the ground for support.Place the walls up and brace them with lumber. Bury cinder blocks and then pour a concrete foundation over it to keep it stable. Then use screws to fix the windows to the frame.

F7IDAHNFTVVKR8X.MEDIUM

Cover this foundation with rocks and stones for drainage. For the roof, use siding for coverage, leaving at least 20-30 percent of open space for ventilation. Add some fans and shelves for easy access and displays.

FPYJ4FKFM2CTGRN.MEDIUM

F242WBBFM2CTGRY.MEDIUM

FONIB68FM2CTGSE.MEDIUM

Finally, it’s time to caulk and paint the outside of the frames. This will create consistency in the look.

FK6SI8BFTVVI0H4.LARGE

Once the paint dries, begin to hone plants and flowers. And revel in the fact that this space is all handmade.

For step-by-step tips, check out TreeHugger  for a full overview and other DIY greenhouse ideas. 

No Foolin’: Improve Indoor Air Quality With These Simple Terrariums

DIY-Terrariums-Bridgette-Meinhold-77

With spring finally finding its way to Chicago, many people are excited to tend to their fall planted seedlings start to sprout. They pull out their garden gloves and tools, ready for another spring of planting, pulling weeds and pruning. But what about those doomed to apartments? No greenery or garden patches for miles. Well, this project takes old glass jars and creates green terrariums to not only add pretty plants to a home but also vastly improve indoor air quality.

First locate a jar. This should be a clear, empty glass jar, nothing too large. If there’s none available in the home, jars can be picked up from any local secondhand store.

DIY-Terrariums-Bridgette-Meinhold-3

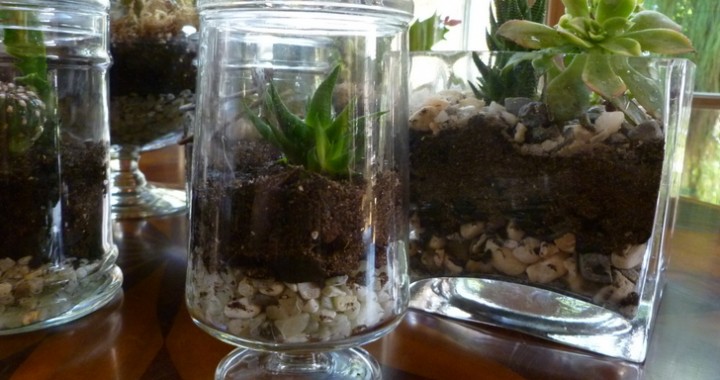
Then decide on the plants. They should be tiny plants that fit comfortably into the jar. For the greatest success, put succulents with succulents, ferns with ferns, etc. Buy the proper soil for each type of plant. This soil, activated charcoal and some rocks will be on the bottom for a false drainage layer.

Start cleaning the inside and outside of the container, removing any residue. Following this step, fill the bottom of the container with rocks or pebbles. Depending on the size of the jar, the depth of rocks should range from 1/2″ to 2.” Cover the rocks with the activated charcoal and then fill the jar with enough soil to so each plant will have enough room for the plant’s roots.

DIY-Terrariums-Bridgette-Meinhold-24

Finally, plant your plants, gently breaking the soil ball until reaching the roots. Dig into the soil with a spoon to create holes to place the plants in and then compact the soil around the plant.

DIY-Terrariums-Bridgette-Meinhold-40

Just as with any other plant, make sure to maintain the plant by watering it regulary with just a shot of water.

DIY-Terrariums-Bridgette-Meinhold-89

Breathe in the fresh air of the home with these new terrariums!

For a more complete guide, check out Inhabitat’s step-by-step directions. 

Plumbing Handyman 101: Pipe Insulation

plumbing pipes insulationHome ownership can make you a plumbing handyman, you just need a few tricks up your sleeve. Want hotter water for longer? Want to save on energy bills? Want to spend less time adjusting the temperature of the water heater? By insulating pipes in a simple, inexpensive process, all of this and more is possible.

Plumbing handyman: pipe insulation tools and materials

Begin by acquiring these materials:

  • Pipe insulation (foil or fiberglass)
  • Mild cleanser
  • Rag
  • Duct Tape
  • Plastic Wrap

kit175_1fa_lead

The first step, as in most projects, is making sure the pipe surfaces are completely free of debris and dust. Using the mild cleanser, clean the pipes thoroughly and allow drying time before installing the selected insulation.

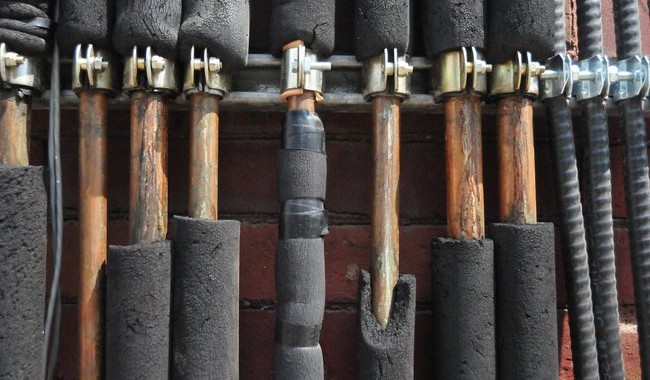
Once clean, start to wrap the insulation around the pipes fully, allowing a 1/2″ overlap for foil or fiberglass insulation. For an easier (but honestly unnecessarily expensive) option, get tubular-sleeve insulation which only requires cutting to size and sliding on.

kit175_1fb_lead

If using fiberglass insulation, make sure to wrap it in plastic wrap to avoid any dripping condensation.

Once all the pipe surfaces are covered, secure the corners and bends with copious amounts of duct tape. Take special precaution with T-Joints, which may require slits in the insulation for a proper fit.

handyman plumber in chicago

This project may not be very glamorous, guest won’t even notice it, but could save anywhere from $400-$600 on energy bills and result in warmer, longer showers needed after a hard day’s work.

For a step-by-step guide, check out DIY Network’s instructions.

Have more plumbing needs or need a plumbing handyman? Contact us for a quote today!